Sunday, January 30, 2011

FROM OLD MAP CABINET TO TV ARMOIRE TO DRINKS CABINET!


We purchased this wonderful cupboard in England. It was originally made to house maps and blue prints. 

Our first use for it was as a TV armoire. It lived in our master bedroom until Hunka Chunka replace the old box tv with a flat screen which was mounted on the wall.  I wanted to use the armoire somewhere in our home and so temporarily moved it to a wall in our living room. There it sat sad and empty....until I had one of my "moments"....:) I thought it would make a charming drinks cabinet!

I covered the hole in the back made for all the tv cords etc by mounting an old framed art piece that had belonged to my mother-in-law. Then I introduced a cute little lamp, and finally an old in-laid tray on which I placed some pretty decanters and glassware. Then I set some of our favorite brandy bottles in the back. 
I have used it several times to serve wine from when my girlfriends come over and I love it. Hope you do too!


Hugs,
Mandy 
I am linking this post to:
http://diane1876.blogspot.com/


http://betweennapsontheporch.blogspot.com/

Thursday, January 20, 2011

FUN PAINTED OLD CHAIRS!

Hi There!
It has been a while since I last blogged, but please understand I was moving three boys bedrooms around, one den, and one huge craft room that sits above our three car garage.....I will cover more about all that in other post!!!!!

Anyway, here is another project I completed before becoming a blogger addict. We purchased a small cherry dining set right before leaving England from our favorite consignment store over there. The set consisted of four chairs similar to the ones shown here:

And a drop leave table, similar to this one:

One of the chairs didn't survive the move or maybe it was already damaged,  don't know but we only have three left. For this particular situation I only wanted to use two of them. I was painting a bed for one of the boys and in between drying time I decided to have some fun with these chairs. I gathered up my craft paints, my stencils, some crackle finish and brushes and went to work. 
Here they are finished and sitting in my sun room:

I purchased the fabric on sale and recovered the chair pads. The zebra fabric goes with the zanny style of the chairs, don't you think?


The chairs are similar but I used different finishes, colors and stencil patterns to give them some ....personality.... that's what I say! 
Mr. Giraffe Chair
Mrs Zebra Chair.
I also glued on some decorative buttons I had on hand to "glitz" them up a bit.

 Here you can see some of the stencil detail and some of the paint techniques.
  I had loads of fun with these two, hope you like them too!

 Thanks so much for stopping by.
Mandy


Linking to:

Venessa's "Inspiration Fridays"

I joined Venessa\
Over at "Southern In My Heart"
http://southerninmyheart.blogspot.com

Also linking to
 Miss Mustard Seed

Thursday, January 6, 2011

HAD A SHOWING....

Well, we had a last minute showing on Tuesday....

Thank goodness the boys went back to school that day, however, then Hunka Chunka and myself had a very dirty, untidy home to get ready...Note the Christmas decorations were still partially up or ready to be put away, the upstairs smelled and looked like teenage boy heaven (!), every room in the house had been used over the holidays and needed attention....what a disaster! 
But somehow, we managed to pull it together for the 4:30 showing....crazy....
A little before pic of the living room, hallway, dining area......

But the person looking didn't like it for various reasons....and we understand....sort of.....we have a very unique home....it is a custom home full of character that we built for our family. It is not perfect by all means, and definately isn't everyone's -cup of tea- but it is a beautifully constructed home built by a German Baptist builder and the craftsmanship and details are awesome.

Summer pic...
 We have stained wood trim throughout, a lot of old, some antique, pieces, and lean towards simple lines with a little farmhouse cottage thrown in... as I said, not everyone's choice, and in this housing market, it makes it an even harder sell. Thank goodness we are not financially burdened or stressed and can afford to live here until we get lucky...(soon, please??).
In the meantime, we will continue to neutralize spaces with paint,
and put some new carpeting in upstairs etc. 
  We have had very few showings, mainly due to the fact that there aren't too many folk looking to buy a house in our price bracket, so  it's hard to decide how much to remove and what to keep, I mean, we may still be living in the house a year from now or more.....yikes!!!! Okay enough rambling....and on the positive side, at least I'll have plenty of projects to show you soon!!!

Thanks so much for stopping by....oh and I think my pics are going to be better as I am learnin' my camera!!!!

Mandy


Tuesday, January 4, 2011

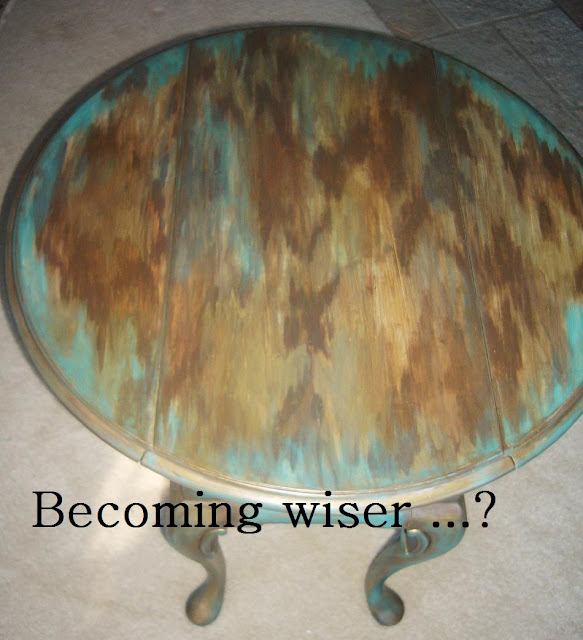
COOL FAUX FINISHED DROP LEAF TABLE

We had a cherry drop leaf side table sitting downstairs in the basement collecting dust because it was too beat up to use anywhere else in the house ....I was inspired by some painted furniture I saw in a catalog and decided to give this little guy a face lift!

Now, this little project took place before I started blogging so I do not have a photo tutorial to show you nor do I have a before pick but I did find a picture on line of a table that looks almost exactly like  my one and here it is:
Anyway, I had no idea what I was doing on this one. I started by lightly sand down the piece and then gave it a coat of primer. Following that,  I basically dry brushed paint on (with a large bristle brush) several different colors of paint. I even added some gold paint to give it a hint of shine...I wiped off any excess paint as I went to help blend and achieve the look I was going for. Finally, I gave it a couple coats of poly to protect the finish and here is the end result!
I really like the final "look" of this piece. The color picks up on my teal/brown accents throughout the room. I figured out from blogging that I could've cut the work time in half by just using a tinted glaze as a last step ... but oh well, it still turned out pretty cool I think? 

 I am linking this post to:
"Before and After Party" http://thriftydecorchick.blogspot.com